Configure basic load balancing on a Citrix ADC VPX appliance
The load balancing feature of a Citrix ADC appliance distributes user requests for web pages and other protected applications across multiple servers that all host (or mirror) the same content. You use load balancing primarily to manage user requests to heavily used applications, preventing poor performance and outages and ensuring that users can access your protected applications. Load balancing also provides fault tolerance; when one server that hosts a protected application becomes unavailable, the feature distributes user requests to the other servers that host the same application.
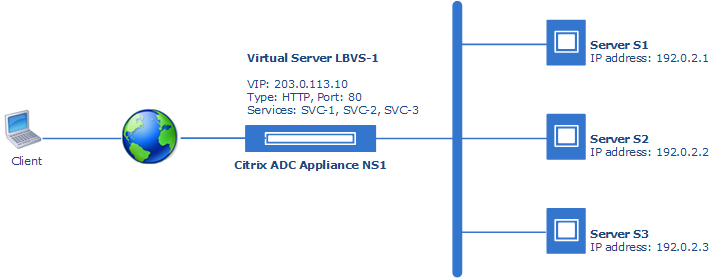
A load balancing setup includes a load-balancing virtual server and multiple load-balanced application servers. The virtual server receives incoming client requests, uses the load balancing algorithm to select an application server, and forwards the requests to the selected application server.
Consider an example in which Example Corp hosts a site at www.example.com. To ensure application availability, the site is hosted on three servers, S1, S2, and S3. A load balancing virtual server, LBVS-1, on a Citrix ADC appliance NS-1 is used to load balance these servers. SVC-1, SVC-2, and SVC-3 are services created on Citrix ADC appliance NS-1 representing S1, S2, and S3.

Before you begin
Before you start configuring load balancing using NITRO REST APIs on a Citrix ADC VPX appliance, make sure that:
-
You have deployed a Citrix ADC VPX appliance and the appliance is UP and running in your setup. For more information, see Deploy a Citrix ADC VPX instance.
-
You have added a subnet IP (SNIP) address on the Citrix ADC appliance. A Citrix ADC uses a subnet IP (SNIP) address as a source IP address to proxy client connections to servers. For more information, see Configuring Subnet IP Addresses.
- You have a basic understanding of the load balancing feature of a Citrix ADC appliance. For more information, see:
- You have a basic understading of the Citrix ADC NITRO REST APIs. For more information, see Citrix ADC NITRO API reference.
Configuration steps
Configuring load balancing on a Citrix ADC appliance using NITRO REST APIs consists of the following steps:
- Create a load balancing virtual server
- Create load balancing services
- Bind the services to the load balancing server
Create a load balancing virtual server
A load balancing virtual server is an entity to which a client sends connection requests for a particular load-balanced website or application. A virtual server is represented by an IP address, a port, and a protocol.
To create a load balancing virtual server on a Citrix ADC VPX appliance, you use the Citrix ADC NITRO API lbvserver object.
For more information about the lbvserver object and its properties, see Citrix NITRO API reference for lbvserver.
Request structure
| Request field | Value |
|---|---|
| HTTP Method | POST |
| URL | http://<Citrix-ADC-IP-address(NSIP)>/nitro/v1/config/lbvserver |
| Request Headers | Content-Type: application/json |
| Request Payload |
{ "lbvserver": { "name":"<value>", "servicetype":"<value>", "ipv46": "<value>", "port": "<value>", } }Example:{ "lbvserver": { "name":"LBVS-1", "servicetype":"HTTP", "ipv46": "203.0.113.10", "port": 443 } }
|
Create load balancing services
A service is an entity, which represents a server or an application running on a server. A service identifies the servers IP address, a port, and a protocol.
To create a load balancing service on a Citrix ADC VPX appliance, you use the Citrix ADC NITRO API service object.
You must create a service for each server to be load balanced.
For more information about the service object and its properties, see Citrix NITRO API reference for service.
Request structure
| Request field | Value |
|---|---|
| HTTP Method | POST |
| URL | http://<Citrix-ADC-IP-address(NSIP)>/nitro/v1/config/service |
| Request Headers | Content-Type: application/json |
| Request Payload |
{"service": { "name": "<service name>", "ip": "<IP address of the server>", "servicetype": "HTTP", "port": 443 }}Example:{"service": { "name": "SVC-1”, "ip": "192.0.2.10", "servicetype": "HTTP", "port": 443 }}
|
Bind the services to the load balancing server
Bind the created services to the load balancing server.
To bind the created services to the load balancing server, you use the Citrix ADC NITRO API lbvserver_service_binding object.
For more information about the lbvserver_service_binding object and its properties, see Citrix NITRO API reference for lbvserver_service_binding.
Request structure
| Request field | Value |
|---|---|
| HTTP Method | PUT |
| URL | http://<Citrix-ADC-IP-address(NSIP)>/nitro/v1/config/lbvserver_service_binding |
| Request Headers | Content-Type: application/json |
| Request Payload |
{"lbvserver_service_binding": { "name": "<name of the virtual server>", "servicename": "Name of the service"}} Example:{"lbvserver_service_binding": { "name": "LBVS-1”"servicename": "SVC-1"}}
|
Sample configuration
| Steps | Curl requests |
|---|---|
| Create a load balancing virtual server | curl -v -X POST -H "Content-Type: application/json" -u nsroot:examplepassword http://192.0.0.33/nitro/v1/config/lbvserver -d '{ "lbvserver": { "name":"LBVS-EN", "servicetype":"HTTP", "ipv46": "203.0.113.10", "port": 80}' |
| Create load balancing services |
curl -v -X POST -H "Content-Type:application/json" -u nsroot:examplepassword http:// 192.0.0.33/nitro/v1/config/service -d '{"service": { "name": "SVC-EN-1", "ip": "192.0.2.10", "servicetype": "HTTP", "port": 80 } }' curl -v -X POST -H "Content-Type:application/json" -u nsroot:examplepassword http:// 192.0.0.33/nitro/v1/config/service -d '{"service": { "name": "SVC-EN-2", "ip": "192.0.2.30", "servicetype": "HTTP", "port": 80 } }'curl -v -X POST -H "Content-Type:application/json" -u nsroot:examplepassword http:// 192.0.0.33/nitro/v1/config/service -d '{"service": { "name": "SVC-EN-3", "ip": "192.0.2.30", "servicetype": "HTTP", "port": 80 } }'
|
| Bind the services to the load balancing server | curl -v -X PUT -H "Content-Type:application/json" -u nsroot:examplepassword http://192.0.0.33/nitro/v1/config/lbvserver_service_binding -d '{"lbvserver_service_binding": { "name": "LBVS-EN", "servicename": "SVC-EN-1", "weight": "1" } }' |